

What is Terminals?
Terminals is the ultimate place for gaming enthusiasts, journalists, and developers to share in their love of games. Gamers of all stripes can check out some of the hottest upcoming releases from both AAA and indie devs that are currently working with Evolve PR and receive updates as soon as news drops for any titles they like. Registered media, streamers, and content creators can additionally request and receive codes to play those games. For developers and publishers, it’s one of the best toolkits available to get your games out to the people you want to reach, streamline contact management, host press kits, distribute codes, and track coverage.
Who is Terminals for?
While Terminals is ultimately designed for video game developers and publishers, as well as members of the media, streamers, and content creators, it’s also a place for gaming enthusiasts to explore upcoming releases. Devs and publishers create their own Terminals while media, content creators, and gamers then visit those Terminals to discover new games and (in the case of registered media) request codes to play them. Media and content creators can also download game assets such as trailers, screenshots, logos, and more. Need a transparent .png? We might have it!
For more details, take a look at our FAQ!
Hoping to request some codes? You’ll need media status.
Media status allows you to request codes for the games on our service. It also provides you with the ability to contact the PR rep for any given game should you have questions about it. Lastly, having media status will make it easier for you to book appointments with our clients during major shows such as PAX or E3.
So, why do you need media status to get access to all of these features? Well, it’s important to keep in mind that Terminals is an Evolve PR platform. Each code that we receive from a developer is expected to provide some type of coverage. We are looking to form a professional relationship with individuals who are established in the gaming industry and are interested in playing, talking, and writing about the titles that we work on. Media status and the criteria associated with it are a way for us to create a standard and starting point upon which we can begin these relationships.
You can find out more about media status here.
Before signing up, make sure that you’re eligible for media status!
There is a bit of a catch! You’ll need to meet a number of criteria in order to be eligible for media status. These vary depending on if you’re a content creator, or if you’re working for a press outlet.
Make sure to take a look at the requirements before signing up!
The sign-up process
Right, so you’ve read the FAQ, you’ve checked out the requirements, and you’re eligible for media status. You’re good to go and are ready to sign up.
This is the dry bit, but everything you need to know about the process will be here.
Let’s get on with it!
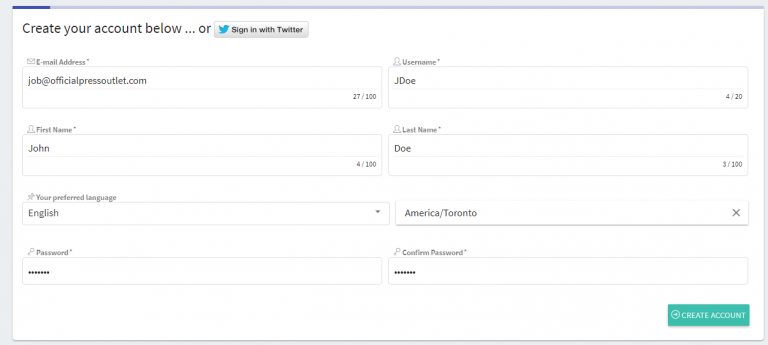
Step 1: Click on the “Join Terminals” in the upper right corner of the Terminals home page.


Step 2: Fill in the required fields in order to create an account, or create one by signing in with Twitter. If possible, use your outlet domain address for registration (ie. [email protected]).
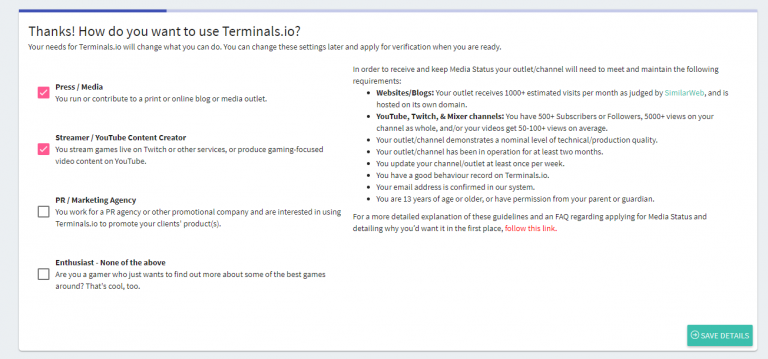
Step 3: Select how you wish to use Terminals and check all boxes that apply. Note the requirements listed on the right side once an option is selected. Very important! Do not select “enthusiast” if you are applying for media status! You will not be able to request a review code if you are set as an enthusiast!
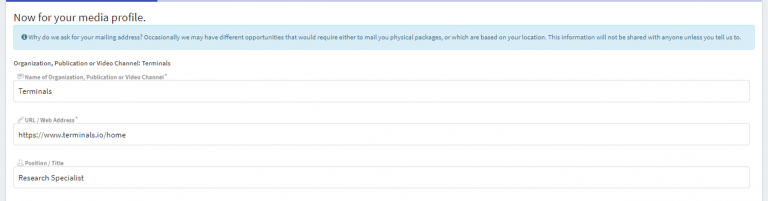
Step 4.1: Fill out your media profile. Include the name of your outlet only in the “Name of Organization, Publication or Video Channel” field.
Step 4.2: If you are open to sponsorship opportunities, click on the the small toggle next to “I am open to sponsored content and paid promotions”.
Depending on your preference, click on the second toggle if you wish to be contacted directly for any type of sponsored opportunity, or simply add your management contact so that we can talk to the right person.

Step 4.3: If you are working as a freelancer, click on the “I am a freelancer” toggle and include the outlets you are currently with or have recently worked for in the “Freelancer outlets” field on the right.

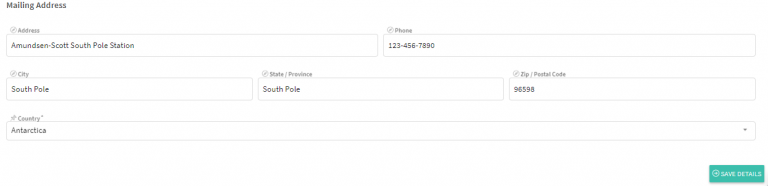
Step 4.4: Type in your mailing address. Indicate your current country accurately as codes may vary per region depending on the games we’re working on.
While the rest of this section is not obligatory, this information shortens the process for any type of physical mail or package we might want to send you in the future.
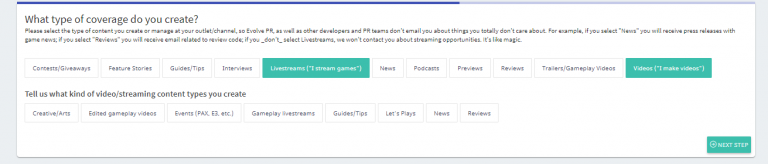
Step 5: Select all tags that apply for the types of coverage that you create.
Note that if you select the “Livestreams” or “Videos” tags, an additional bar will appear asking what type of video content you create.
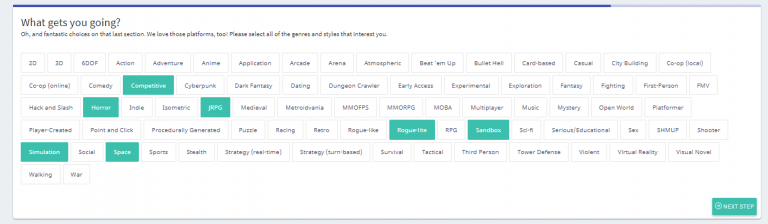
***An important note for steps 6 and 7: Be accurate when selecting the tags that apply. We send out news according to user preferences, which are the tags for the steps below. Be as accurate as possible if you want to avoid getting news on genres or platforms which do not interest you!***
Step 6: Select all platforms/consoles of interest.

Step 7: Select all genres and styles of games that you enjoy playing.
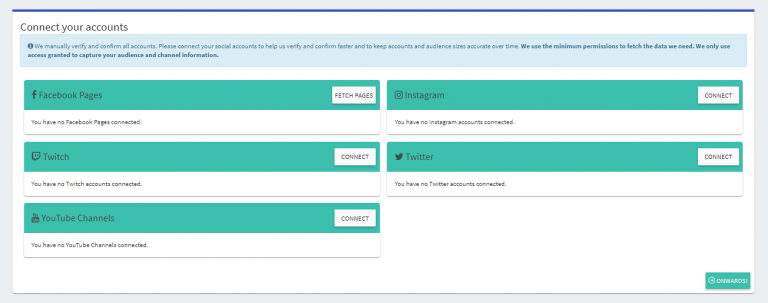
Step 8: Connect all relevant accounts. Keep in mind that the more information included, the less time it takes to get your account verified.
***Mixer users, connect a social media account (ie. Twitter) that includes a link to your channel. This is a temporary measure while we work on integrating Mixer support into Terminals.***
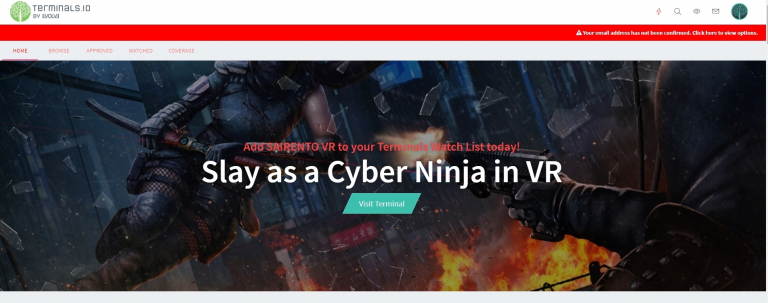
Step 9: Following your account creation, you will be redirected to the Terminals home page. Note the red bar indicating that your email address has not been confirmed.
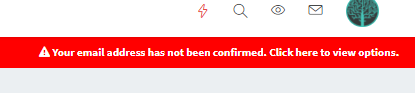
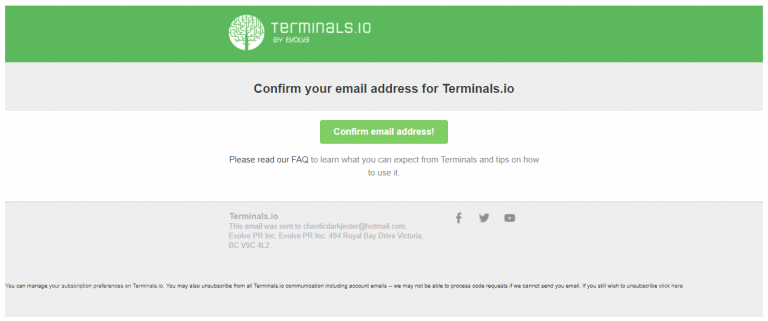
Check your inbox (and in certain cases, junk mail) for our confirmation email. We won’t be able to verify your account for media status until your email address is confirmed.
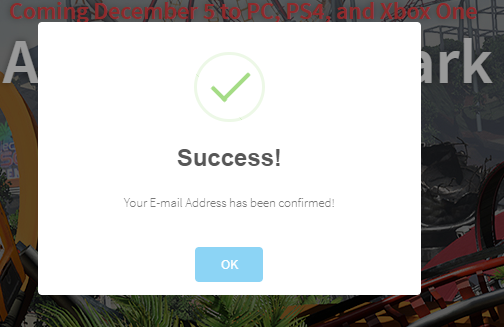
Once your email address is confirmed, you will be redirected to the Terminals home page where you will see a small box indicating that your address is now confirmed.
Step 10: Waiting for verification. Once your account is created and your address is confirmed, your account profile will have a yellow banner indicating that you are currently queued for approval. Verifications are done manually by Terminals staff and can take up to a week.

If everything is in order and you meet the media status requirements, you’ll soon receive an email indicating that you’ve been approved. Congratulations!
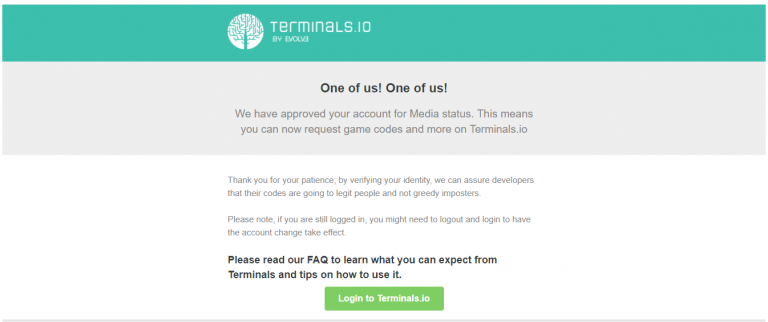
Welcome to Terminals!
And that’s it! With a verified account, you’ll now be able to place code requests and use other useful features that are reserved for verified users.
We hope that you’ll enjoy Terminals and the many upcoming features that will appear in the future. Feel free to drop us a line at [email protected] if ever you have any questions or comments about the platform.
Happy gaming!